 When building a computer, selecting the right components can be difficult at times.
I always start with the what do I need to connect to the computer. Here are some of the questions that you need to answer. How many USB Ports you will need, how many monitors will you connect to the computer (my standard is now two); are you going to need a DVD drive to load software? What about Bluetooth for the wireless speakers and headphones or ear buds? Do you need a WI-FI adapter so you don’t need to have the computer next to the internet gateway?
Some of the above will connect via USB ports and I have seen some people with at least 10 different things plugged into the computer at the same time. USB Hubs will help but having them plugged directly into the computer often allows them to work faster. Some of these items can be built into the mainboard or connected directly like the WI-FI adapter. All of this will help you decide the mainboard you want based on the features that are available with it and then you get to choose whether it will be fitting in a very large tower case or something smaller for your desktop.
 Once you decide on that mainboard, you can then choose the processor and memory because they are all depending on what mainboard you chose as they must match exactly, and that can be tricky. In my own effort to build computers, and I have settled on the Asus mainboards, you can then go to their website and they have a tool that tells you exactly which processor goes into the particular mainboard. Then I go over to Kingston’s or Crucial’s websites to see what memory will work for the mainboard. Then again, depending on the mainboard, your choice for storage can be either a spinning hard drive, SSD Sata drive, or M.2 NVME SSD drive.
So once you select all of those components, you then can choose what case to put it in and I must say, I have been impressed lately with the offerings from bequiet!, a German maker of very quiet computer cases. What I really like is when you look over the CPU Fans, they have a motherboard selector tool to tell you if their fans will work with your combination of processor and mainboard. A truly cool tool. They also do an excellent job of telling you the differences between all of the cases and power supplies so you can select what is right for your system.
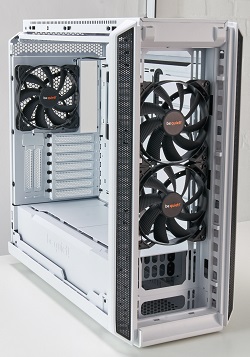
 So, in my own situation, I have fairly new components selected but an old noisy case that they have been installed in so I decided to see for myself what the difference in the bequiet! Case, CPU Fan, and power supply can do. The case I got is the Silent Base 601.
The first impression is that it is solid and very well built made of ABS Steel. Remove a side panel and it feels heavier than many of the cheap cases do. They are made of solid material and have foam dampening material on the inside as well for quiet operations. The vents inside the case also are noise dampening and there are two preinstalled 140mm super quiet fans installed in the case. I am going with an air cooled system but if you want water cooled installed, there is room and connectors available as well. This case will handle a mainboard all the way up to an extended ATX and anything smaller. It will also support seven 3.5 inch hard drives and it wasn’t that long ago I had four of them in my computer. It is considered a mid tower case and stands 20 inches high by 10 inches wide and about 22 inches deep and weighs almost 25 pounds without the power supply. My only quibble so far is that there is no place for a DVD drive inside the case.
 As to power supply, I went with the Straight Power 11 series. A combination of virtual silence, 80 PLUS efficiency up to 94%, a wire-free design and convenient modular cable management so that if you don’t need all of those cables plugged in, you can set them aside.
Take a look at the side and you will see the guide of what goes to what device. The Straight Power 11 Platinum series is available from 550W all the way to 1200W. I got the 750W Unit that comes with the 135mm Silent Wings 3 fan that they say is virtually inaudible. This gives me lots of power for adding more hard drives, video cards, and the like.
It also comes with a 5 year warranty. It has an average life time of 100,000 hours or 4166 days or 11.4 years of continuous use, my kind of power supply. It weighs almost 4 pounds.
My final piece of the upgrade is the Shadow Rock LP CPU Fan.
 Again, I am going for quiet and reliability.
According to the specs, if the fan is running at less than full capacity, it is considered whisper quiet level. Purdue University has a terrific noise chart here. I like this particular CPU Fan as it is quite a bit smaller than many others that are available and would be perfect for a small form factor case. It is rated at 130TDP so it can be used with some pretty high performance processors including an Intel Core i9 10th Generation 10 Core processor. It also comes with all of the accessories you need to install it in the case.
So, back to my project.
What needs to be done, besides shutting down the computer, is to first gather some anti-static bags to keep any of the removed components from getting a charge with me getting in and out of the chair or moving about. Next is to unplug everything from the case including all those little USB connectors hiding in the back. Once the side panels of the current case are removed, tap the anti-static pad I have and then unplug the power supply cables from the mainboard, hard drives, dvd drive, etc. then unplug the case fans and cpu fan. If you have SATA cables plugged into drives, remove them as well. If nothing else is plugged into the mainboard, I would remove the drives and get them out of the way and also unscrew the power supply from the back and remove it unless the old case and power supply are heading for the recycling center. You may also have to remove the front cover to get the DVD drive out.
The CPU, CPU Fan, memory, and any M.2 cards you have plugged in can stay connected to the mainboard. If you have graphics cards, ethernet cards, or any other PCI or PCIX cards, now is a good time to remove them and stash them in the antistatic bags. That leaves the mainboard and there are a number of screws holding it in place in the case. If you have a MicroATX board, there could be 7 screws and a full size ATX mainboard might have 9 or 10. Be sure to tap that anti-static pad often and when you do remove the mainboard, place it on an anti-static bag. Finally, you will need to remove the I/O Shield where all of the external devices plug into the mainboard as you will move that to the new case as well. It is a lot of work, you do need to be really careful about static electricity, and that is why the professionals make such good money doing this sort of thing.
In taking a closer look at the Silent Base 601 Case, I like what I see in how it is so flexible for installing components but also routing the cables and keeping air flow paths clear. It comes with an extra hard drive cage to give you lots of options for both 3.5 and 2.5 inch drives and has a very unique parking place for SSD behind the mainboard!
As you get ready to begin the assembly. First take a close look at the selection of power cables for the power supply and set aside what you will be needing. You also need to double-check the connectors that are on the mainboard as you probably won’t need a lot of them. I would also recommend connecting the power cables to the power supply before installing the PS into the case as it will be difficult to connect them after. In fact, I discovered that because of so many options for routing cables, it is easy to make the wrong choice and then having to unplug, rerun, and then plug back in the cable.
Assembling the Shadow Rock LP CPU Fan can be a little intimidating at first as there are so many parts to support over a dozen different CPU models and types. You need to make sure that the case you are installing it in will allow you to get to the back of the mainboard to install the back plate there. There are a lot of steps to follow and you need to pay attention though I do wish they had some better images, for instance, how to orient the intel mounting brackets; up or down? The other complaint I have with the CPU Fan is that it sits right on top of the memory modules to the side and so if you need to swap out memory later on, you will have to remove the fan which also means cleaning the CPU and fan and then adding more thermal paste.
Having assembled several hundred computers over the years, it still wasn’t a quick and simple job as you do have to plan where things are going, how to get the cables there, and of course, select the right ones. I am also so used to getting Intel processors that come with a fan that you just plop down and fasten in so the assembly process for the Shadow Rock LP was a little difficult and twice had to look for help on doing that.
But once it was all connected and started up, I was absolutely amazed as to how quiet the computer is. There are four fans inside the machine and I hear more of the cicadas, crickets, and what ever else is outside making odd noises than I do of the computer. Well worth the time and money and wish I had done it long ago.
At Newegg, these components will run you $43 for the Shadow Rock LP; The Straight Power 11 Platinum is $150; and the Silent Base 601 Window is $140 for a total of $333. You can see why being very quiet can be a bit more expensive but I tell you, it is worth it to have this kind of quiet in my office.
 So, what is new with bequiet! Since then?
A new CPU Fan in the Shadow Rock series, the Rock 3, a white fan that will cool up to 190W TDP and while much larger, does not block access to the memory modules so if your case has room, it is a terrific alternative.
The Shadow Rock series is their middle line of CPU coolers designed for features like that 190W of cooling power but also very quiet with six copper heat pipes and a very quiet 24db, just above a whisper at full speed. And very cool to look at. Available next month at around $60.
The Silent Base 802 is also in the middle of their lineup giving you a mix of maximum silence and flexibility in a case and the ability to get some work done without any tools. It is considered a mid tower case but it is just short of the full size case so if you plan on cramming a lot of hardware inside, it has the room.
What I like about it is that you have the choice of either a silent full panel or airflow panel on the front and the top cover as well all depending on your priority for this case. There are also three 140mm preinstalled fans, you can add three more, and all can be controlled by a single switch or the PWM signal.
It is also radiator friendly with room for one at the top or front of the case. It is big enough for three traditional disk drives or up to seven 2.5 inch SSD drives. Available in November at around $160.
So, I saved the best for last and that is the Pure Loop liquid cooling radiator system.
 The first one that I have seen that looks easy to install and maintain.
What really interested me is the intended long life and use of this radiator that finally looks like a great alternative to a fan based cooler.
And if you haven’t yet looked at water or liquid cooling, mwave.com.au has a terrific article about what you need to know. Look at the image on the screen there and you will quickly see why the new Pure Loop system is so attractive. No Reservoir, no pump, no fittings, no water blocks and no extra tubing. Just all one unit, connect the radiator, attach to the CPU and you are done.
The benefits are a quieter system and the ability to run it faster if your processor supports over clocking. I can’t wait to try one. Available next month starting around $90 depending on which CPU you need to cool.
Robert Sanborn
September 2020